
How to make gingerbread houses out of Pop Tarts

Want more creative liberty with your gingerbread house? Use Pop-Tarts® and build your own!
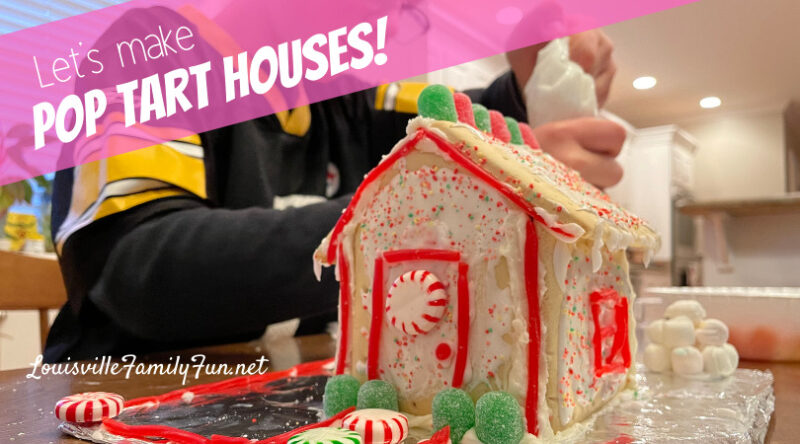
We had so much fun creating our very own gingerbread houses. No kits required! With very few ingredients, this project was really inexpensive too.
We set out to make pop tart gingerbread houses without any experience. I didn’t know what to expect and honestly, thought we would have a really good ‘nailed it’ epic fail and lots of laughs. Well, we did have lots of laughs. But, also, lots of high-fives. It was so easy and so much fun.
I have found that the price of buying actual gingerbread kits for everyone in our family would add up to a lot of money quickly. And, in the past, we have had mixed success with those kits. Therefore, it was time to start something new and find a way we could all get in on the fun and not spend say $50 on kits!
Instead, I got almost everything at the Dollar Tree. If you get four boxes of toaster pastries, I estimate you would spend at most $16 for 4 of you to make houses and that’s much more affordable.
Here is what you need to make pop tart gingerbread houses:
For the house
Box of toaster pastries, any flavor ($1)
Icing (see below for easy icing to make)
Plastic baggies if you don’t have piping bags (not too flimsy!) ($1)
Powdered Sugar ($2)
Cream of Tartar ($4….unless you already have some!)
Water
Optional: Food coloring
For the base
Cardboard
Aluminum Foil ($1)
Recommended decorations
Gum drops ($1)
Pull-apart Twizzlers ($1)
Red and Green starlight mints ($1)
After dinner butter mints ($1)
How to make your icing
First, you should make your icing so it is ready for piping. Icing is three ingredients: powdered sugar, water, and cream of tartar (for hardening). I don’t measure, so bear with me on this one as I am going to estimate but tell you want to look for…..I don’t usually type out recipes on this site!
In a bowl, mix together about 2 cups of powdered sugar and 1 T of cream of tartar. Gradually, and I mean little bits at a time, add in water. You can’t take water back out! Mix. It will be clumpy so add a tiny bit more water. Mix. Add water gradually until you can mix it smoothly but the icing globs off of your spoon with gravity. It should not drip.
If you add too much water, you can add a little more powdered sugar to make it thick again but you don’t want to keep playing this game back and forth! Therefore, don’t add water too quickly! You can add food coloring if you don’t want plain white or split it into bowls and make a variety of colors. We chose to stick with white.
If you have a piping bag, that’s the best option because they are more durable. However, I find that decent sandwich baggies work as well. Just spoon the icing into the baggie, smooth it toward a corner. Cut a small bit of the corner out of the bag. You can twist the other side of the baggie to close it up and create a mini piping bag. Keep the baggie twister so the icing doesn’t come out the top! You are ready to make a pop tart gingerbread house!
How to make your house
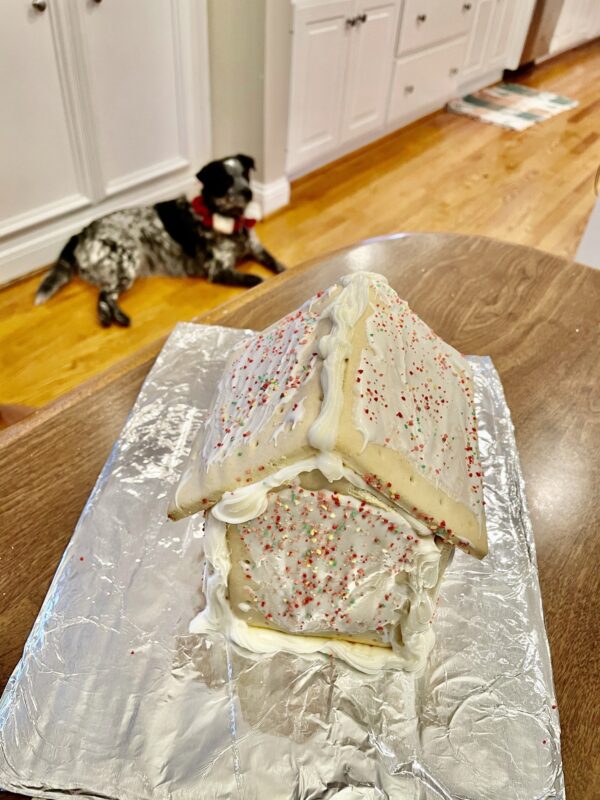
Cut your flat cardboard to about the size of a piece of paper. Cover it with aluminum foil to make for a shiny, clean working space. Plus, I think the shiny makes for a great reflective bottom for snowy pop tart gingerbread houses!
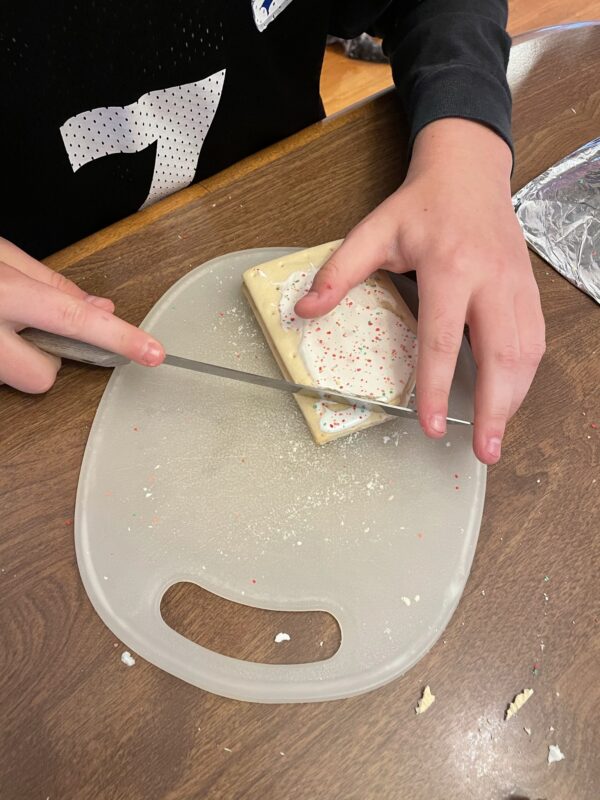
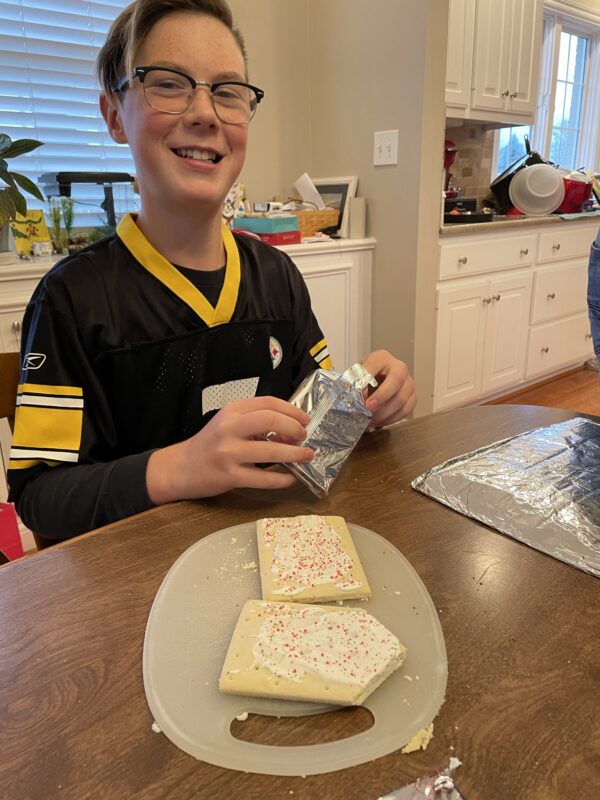
First, you have to cut two pop tarts to be the front and back of the house. These pieces will have a triangular top when you cut off corners and will stand vertically (tall) to be the front and back of the house with the slants you cut for the roof. See photos above.
On a cutting board, line up the short edge of one pop tart (will be a side piece) with the bottom of the long edge of pop tart you are going to cut. You are measuring where to cut for the roof. Where the side piece ends, cut the front piece on an angle to the middle of its top. Repeat this on the other side to make an even triangle at the top. Use this pop tart as a template to cut the another so they match. This is confusing to describe, refer to the photos!
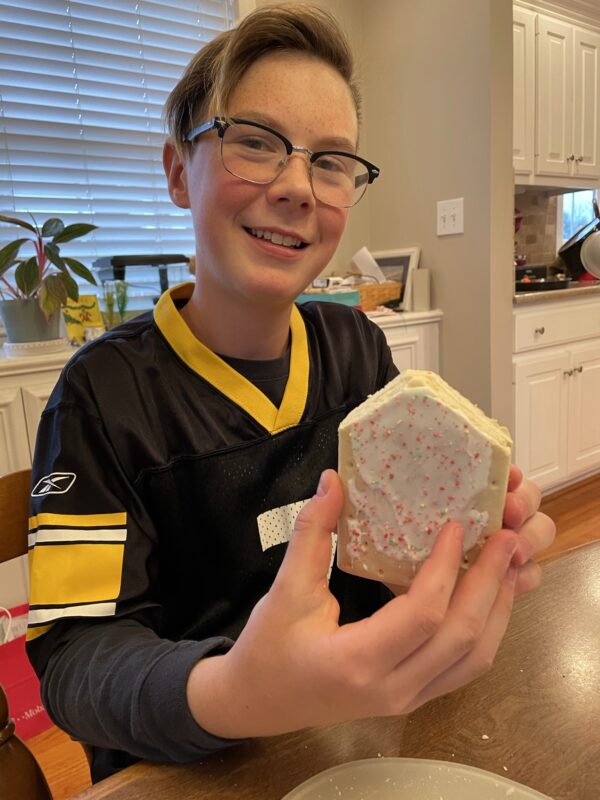
You now have two side pop tarts that will lay horizontally, two pop tarts that have been cut for the front and back of the house, and two roof pop tarts. Let’s build pop tart gingerbread houses.
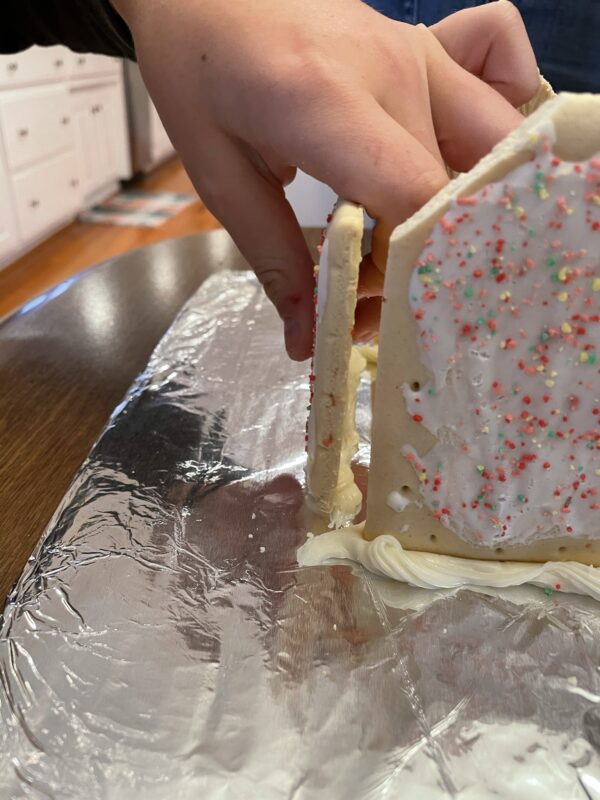
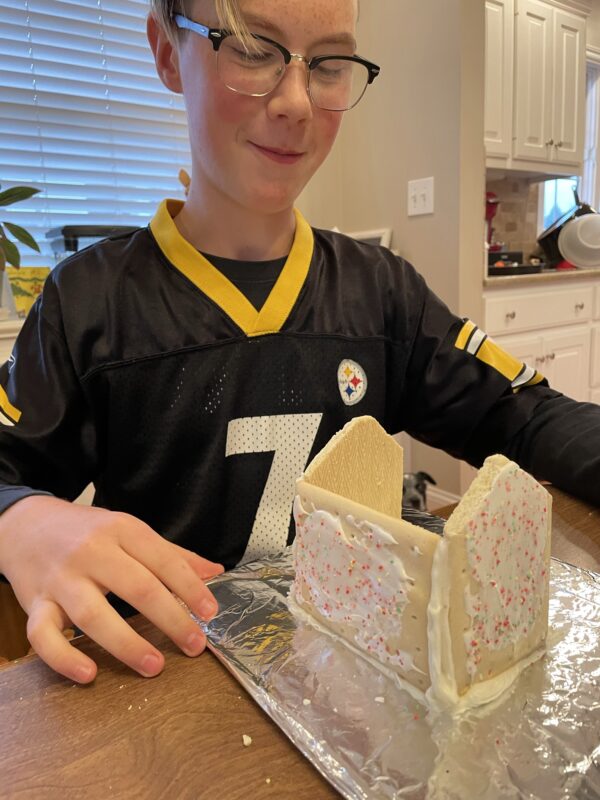
Next, build the walls on your board. Pipe the long edge of a side piece with icing and position it where you want toward the center of the board. Pipe the short edge of this piece with icing and the bottom of the front pop tart. Glue these together! Continue this process around to make the walls. Extra hands are helpful during the process. Wait for it to set and get decorations ready while the walls get solid.
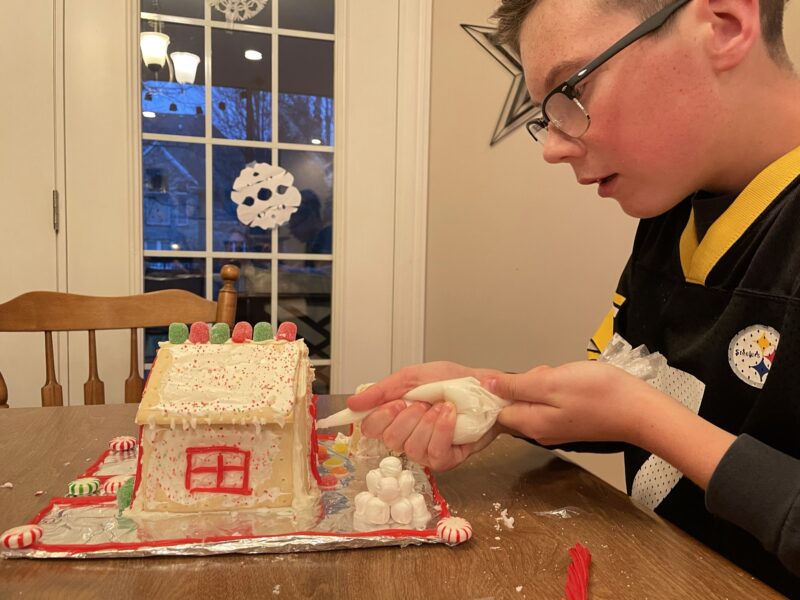
When you feel your pop tart gingerbread house is sturdy, pipe one side of the roof edges of the house and place your pop tart on the angle but not higher than the tip of the triangle. Do the same for the other side. Pipe extra icing between your two roof pieces and anywhere else you see holes. Wait to decorate the house until the icing is set. In the meantime, you can get candies ready or decorate the base.
Decorating your house
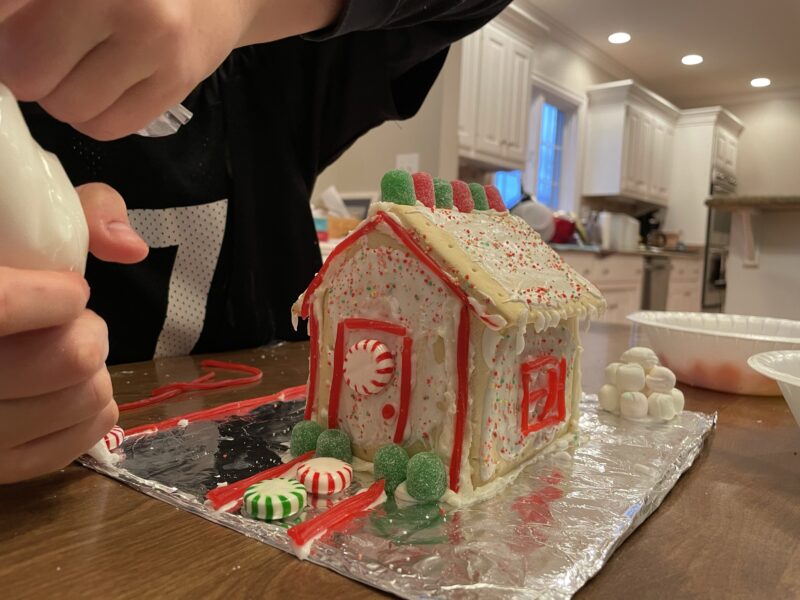
I always tell my kids to do the roof last because adding weight to the top can sometimes cause those pieces to slide down. Be sure to encourage them to decorate from the base up. When decorating the walls, don’t push!
Pipe your icing up, that’s another tip. When piping down, if it doesn’t stick, it all just falls. But, if you pipe up on the walls, you can finish with a slight tap to disconnect the icing from your bag and the line of icing will tend to stick instead of fall.
Pipe generous globs of icing to connect candies because when it dries out, if you don’t have enough, they will easily fall off or move when touched. You can always mix up a little more icing.
Be creative and cut up the strings of licorice and cut gum drops to be smaller shapes or just little discs. What’s also good about gum drops is they are sticky when you cut them making it easy to create other things with them!
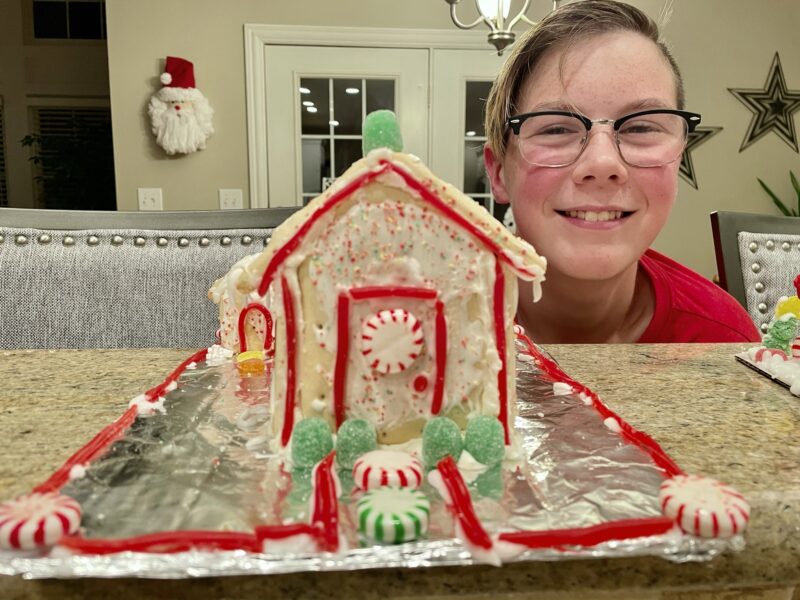
Use your imagination! My son used some other pop tarts to make a dog house in the back of his pop tart gingerbread house. Also, he stacked dinner mints to make a pile of snowballs. So much fun. He’s 13 and loved this because he felt like it was more open than the set pieces from a box with an expected image the kids never seem to master.
We created our own masterpiece and it was the most fun we have had with gingerbread houses. I don’t think we will ever go back. New tradition made this year: pop tart gingerbread houses for the win!
Click here for more ideas for family fun this winter in Louisville


